Apps Archives | Lean Apps GmbH

Overcoming Top 5 Challenges of Outsourcing

Outsourcing is hard. We get it. But chances are that if you are failing to outsource, you will fail to insource too.

We often hear horror stories from our clients on being cheated off by their previous outsourcing partners. And how they swear never to work with anyone from India, or from Eastern Europe.

Usually, their biggest complaint is that they didn’t get what they were promised. Or what they did get was not delivered in time.

Newsflash: It’s just as much your fault as that of your outsourcing partner.

Just like for a product to sell, you need to find the right product-market fit. You also need to find the right outsourcing partner that fits your company culture and needs. Only then can your relationship work. It’s like hiring a company employee, except that he/she would sit in a different office.

If you have been outsourcing or looking to outsource, then it’s not just enough to be aware of the challenges. You must also know how to find workarounds or solutions to overcome these challenges. Here are our insights into overcoming the top 5 challenges faced by companies while hiring outsourcing partners:


1) Communication

Communication can be very hard even with employees in the same building. So how does one go about communicating effectively across continents and different time zones?


Communication with Outsourcing Company

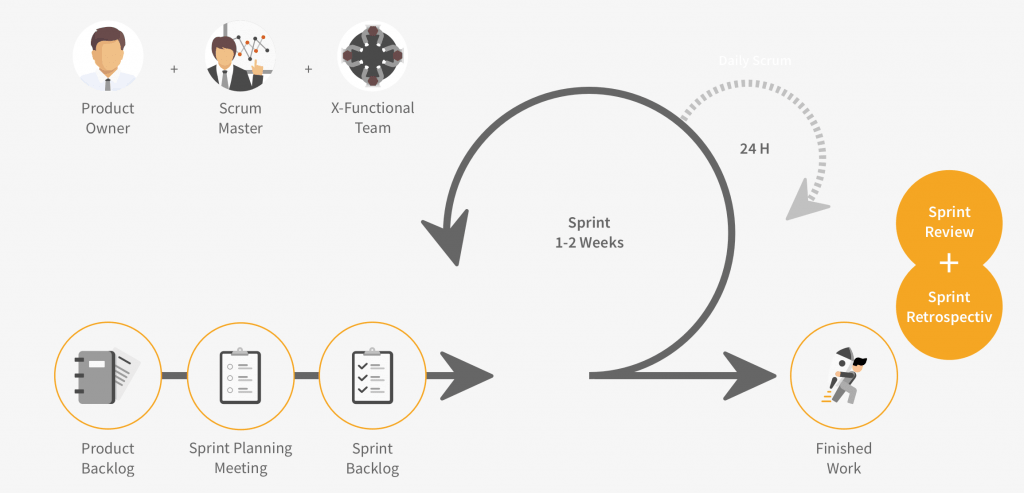
First of all, lay clear Sprint goals via JIRA user stories. Secondly, talk to your outsourcing team daily via daily standup. Thirdly, keep in constant touch during the day via slack/Microsoft teams and make sure to use video to communicate. And finally, use post-it collaboration tools like Mural or Miro during workshops.  

Remember that there is no such thing as over-communication. Go on communicating till it feels like face-to-face communication.

And to test the temperament of your potential partner, you can ask them for an estimated delivery date during the pitching and sales process. By doing so, you can find out if they make an effort to understand your business, your users, your product need etc.? Do they ask the right questions? Do they anticipate a few slippery slopes? Do they realistically consider all of this while planning the timeline? If they are setting early deadlines in their enthusiasm to get a contract, take this as an early warning of bad communication.

Before you sign the final contract, make sure you have an upfront understanding of each other’s roles/responsibilities. Get it absolutely clear how each of you would contribute to the efficiency of business.

What has worked wonders for us is to leave as little room for ambiguity as possible, and have clear deliverables and a daily contact with our partner companies.


2) Trust

It takes a long time to build trust between the two parties. But often you do not get a long time to decide whether you want to work with a company on a long-term basis. Such decisions have to be made quite promptly in business.


In order to make that decision-making process faster and more robust, we suggest hackathons or trial-runs to check the compatibility between the two companies.

In a hackathon or trial-run, we usually ask the hiring company to give us a project that is self-contained, and does not require any work from their ongoing projects. A timeframe of two-weeks is usually assigned to deliver the outcome. This allows us to understand the customer. Similarly, they can also understand the process we follow, how we communicate and the speed and quality of our delivery.

It’s truly a very hands-on experience. A snapshot of what to expect before signing a long-term contract!


3) Quality

One of the biggest insecurities of a hiring company is to find out that they have been served with a poorly written code. And if you are blindly trusting the services of your outsourcing partner, you might find out about the poor quality or problems in your product quite late in your journey.

Quality in Outsourcing Company

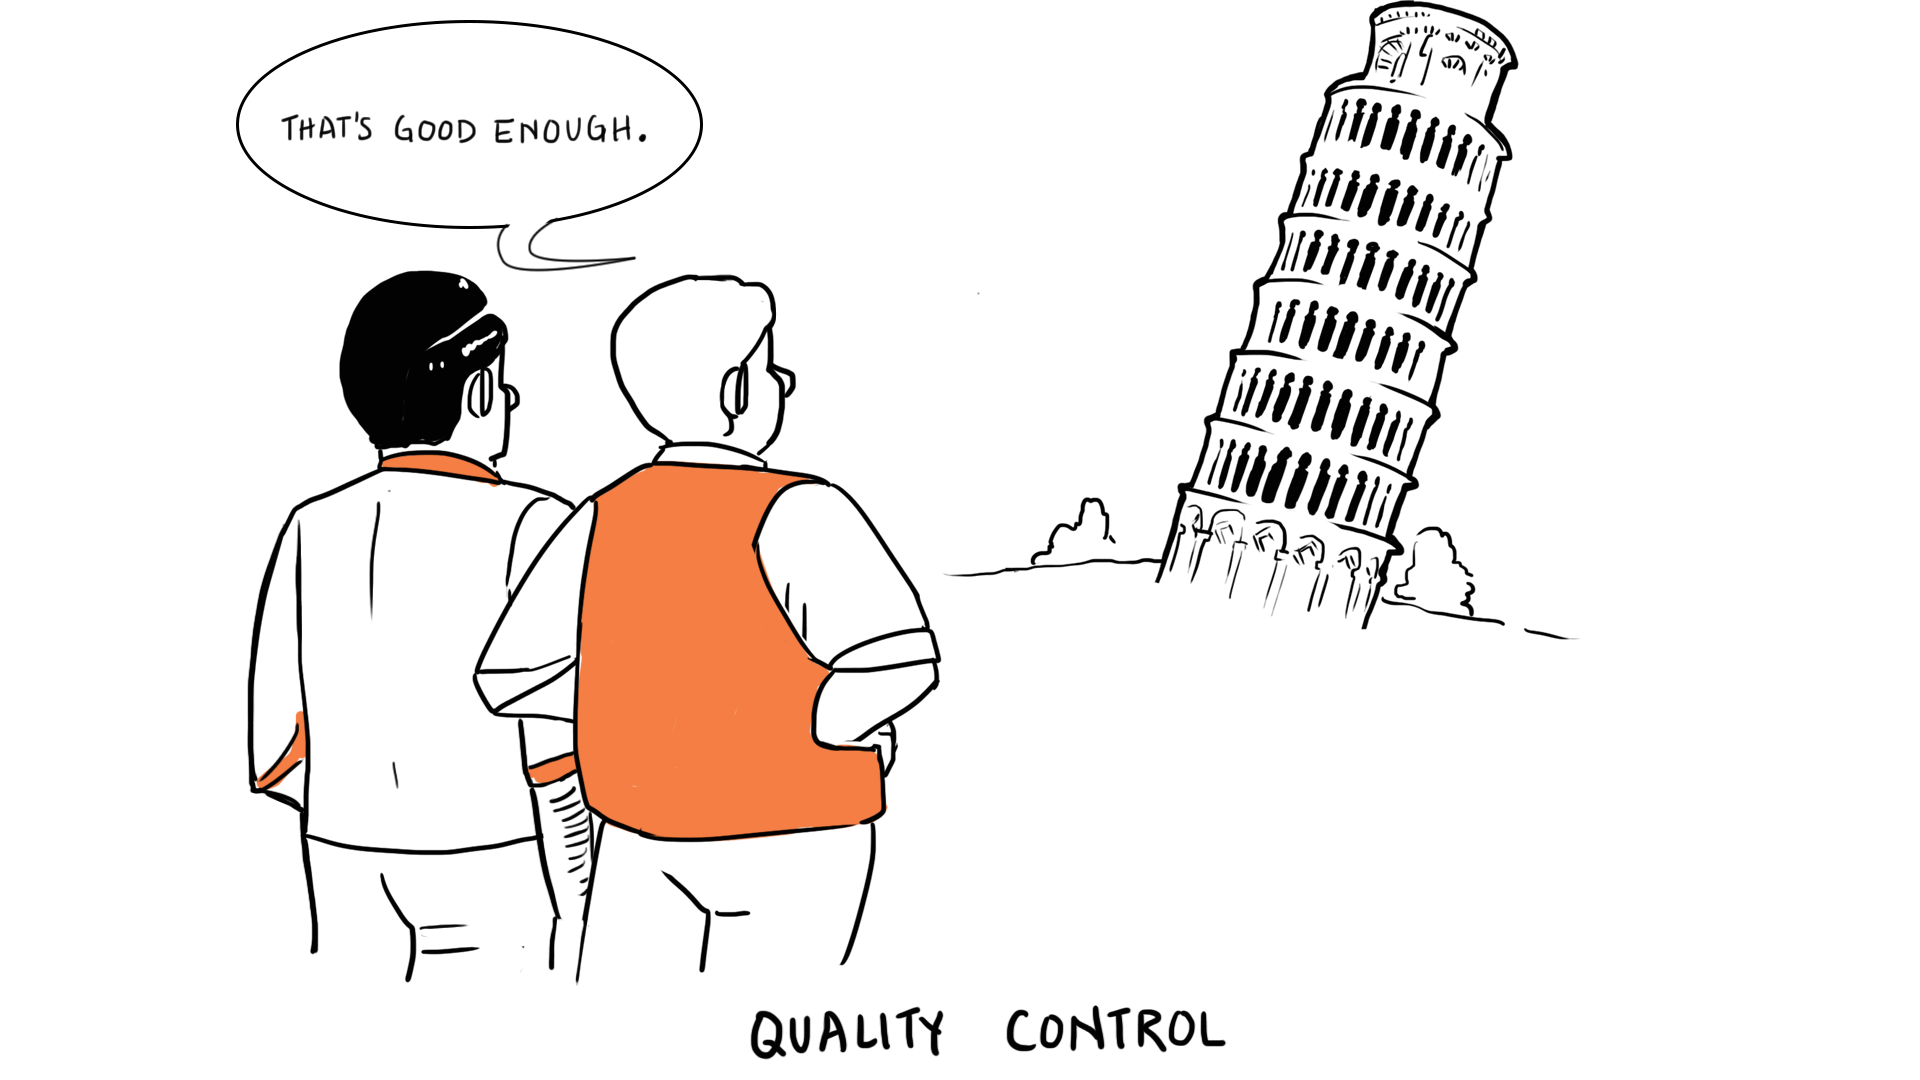
To ensure that you don’t get swindled off, hire your own technical architect. And have the code reviewed after every sprint, or at least every month. Define code review guidelines for frontend and backend. Make it clear that sprint would be considered complete only after the code review has been done. At your end, you can achieve some level of code quality by implementing tools such as Sonarqube. 

Companies that do not have in-house technical architects can also go for a two-vendor strategy: one for development and one for architecture. Make sure that you have a clear understanding with the outsourcing partner about the authority and decision-making power for the affected business functions. All of this must be written into the service contract and everyone involved must be aware of the terms.


4) Culture

No one can deny the power of working under the same roof, going out for beers in the evening or celebrating birthdays together. It’s all part of the company culture and the friendships that come out of such proximity.

Culture in Outsourcing Company

When an outsourcing company is hired, sometimes it can lead to an “us versus them” kind of conflict in a company owing to culture clashes.

One way to avoid this is to give preference to partners that demonstrate similar values in their organizations. If honesty is the most important virtue of your employees, make sure that your outsourcing partner also demonstrates honesty in their work.

And if it’s your first time outsourcing in a company that is as close knit as a family, we suggest expanding your outsourcing slowly. Take baby steps before implementing a large-scale strategy to outsource. This will allow you to make adjustments, and scale up or back as your company evolves.


5) Cost

The cost of building your own in-house expertise can be very steep. So most companies take the fastest and the most innovative route of outsourcing. Makes sense! You get something built from outside, pay the cost and think you are done. But hang on!


What happens when you find bugs or your server goes down? You need your outsourcing company again for maintenance. It’s as if you are bound to those external developers forever. And by now your outsourcing company has other clients that have more urgent needs, so you may not be their highest priority.

To avoid such precarious situations, we suggest that you start building your in-house expertise slowly on the side whilst working with your outsourcing partner. Until then, it is wise to include the maintenance of your product in the contract with your partner.

Keep in mind that it is still cheaper to get the outsourcing company to build your product than hire a bunch of developers, pay them salaries, their insurances, sick leave and holidays at the outset. You can do it over a period of time, but it’s a huge cost to absorb at the beginning of a new project.

Remember your outsourcing partner is not a one-night stand. It’s a live-in relationship. So select wisely! 

10 Reasons to choose React Native for App Development

Facebook created it and developers swear by it. Instagram, Skype, Airbnb, Walmart, Tesla – the world’s most successful apps are using it. React Native, An exciting, open-source framework is fast becoming the most popular choice for developing both iOS and Android apps.


Here are the top 10 reasons you should opt for React Native development companies:


1. Develop fast and save more

If you want to get maximum output with minimum effort, then React Native is your best bet.

With React Native, you can use the same code (almost the same) for the web, iOS, and Android, and shorten the development cycle by at least half. Result? Your Product Manager can save ample amount of time and cost in developing an app without compromising on quality.

2. Go Cross-Platform

Traditionally, Non react native development companies have been building separate apps for iOS and Android. And it has often led to inconsistent user experience among different platforms.

But with React Native, you can build iOS and Android apps at the same time and create a more consistent and fluid user experience.

3. Create UX of Native App

One of the big disadvantages of hybrid apps built in Ionic or Phonegap is that the user experience never feels like that of a native app. It always gives a feeling of web experience.

React Native takes the native user interface building blocks and combines them with their own Javascript to create a user experience closest to that of native apps.

Since the same building blocks are used for iOS and Android, they give the same look and feel that the users expect. Developers do have the choice to write a mixture of native and React code to get the exact functionality. And they can do that while maintaining the native experience.

4. Add new features in less time

Usually, after publishing your app on the App Store and Google Play, you want to add new features for your users. And it always requires going through the build process again and uploading updated versions of the app on the store.

It can take a while before Apple or Google approve the updates. Also, the updated apps have to be installed by the users manually. But in React Native, you don’t need to worry about all this.

Thanks to plugins like CodePush, the new updates get automatically reflected during the run time and you can watch the changes without the complete re-launch of the app.

5. Deliver Personalization

With React Native, you can push a personalized UX to your individual users on the same app.

Following the practice of Clean Architecture in React Native, you can separate Native code, Framework code, Javascript code, and CSS Styling. This allows developers to easily deliver different styles to the app from the server side. So much so that you can define personalized style per user group on the server side and each user would then see their own personalized UX.

Remember personalization is the core requirement for Digital Transformation.

6. Write once, use everywhere

In a typical mobile app development scenario, developers need to write separate codes for the web, Android and iOS. But with React Native, your developers need to write the code only once, and it would run on multiple platforms.

There is no need to write the code again and again. Almost 70% of the code is shared between web, iOS, and Android. Only minor portions of the app need to be tailored for different platforms.


7. Third-party plugins

A completely original and authentic software foundation for an app can cost a lot of money and time. To reduce the cost, you must take the approach of re-usabilty, either through the online tools or through some react native development companies that can provide you so.

There is already a huge glut of reusable libraries available for React Native, and a lot more is being added to the community by top react native development companies such as WIX.  

8. Get online community support

Since no specific iOS or Android programming languages are required to use React Native, most frontend developers with experience in Javascript can easily work on it. That’s the reason for its wild popularity.

React Native has gathered a massive pool of online community. If at any point you face a problem, you can easily dive into this pool to seek help. React Native enthusiasts are quick to help fix problems and share skills required to excel in the field.

9. Detect bugs easily

Since the code is re-usable in React native, you only need one update for two platforms. This makes the detection of bugs between codebases a lot easier.

Your team does not have to spend hours looking for bugs in two separate codebases. A single decision is all that is needed to fix and update the app.

10. Build MVP faster

Working with React Native development companies, your development costs and cycles are reduced by 50%. This means you can take bigger risks while testing your business models. You can launch the first version of your app with minimum functionality and keep all the secondary features for later development.

Once you have identified the demand for additional features, you can start investing in them. This way you don’t waste your time developing detailed interfaces and branded designs. Instead, you implement an early version of your app.


It helps you avoid failure at a later stage. With React Native, the number of bugs also tend to be lower because of a single code, which also speeds up testing. Single code base lowers maintenance costs.

Having built over 100 apps reaching 10 million users in the last four years, we are creating multiple reusable components to add to the libraries for mobile app (React Native) too.

As a react native development company, we have already created generic lego-like components such as those required for registration, login, authorization, side menu, footer menu, CRUD screens, showing lists, search, filter, notifications, payments, analytics etc. to shorten the development cycle. This way we don’t have to build these features from scratch for new apps each time. We code a lot less and deliver value a lot faster.

Our goal is to reach a point where we can deliver 70% of the requirements through our reusable components, and only develop the rest 30%.

5 ways to reduce the cost of app development

One of the first questions we get from our clients is: What is the cost of app development? Our short and quick answer is: Go to our app calculator and find it out in a minute.

But for those who insist on getting an instant rough estimate, this is what we say: A small, simple app with minimal features can cost anything around $15,000, whereas a highly complex app with deep integrations can cost anything around $100,000.

The long answer, however, is that the cost of an app can be negotiated and reduced significantly by taking into account these five basic measures:

1. Use React Native

React native is a perfect platform for developing mobile apps for both iOS and Android because its building blocks can be reused as native components. It helps you save an incredible amount of time and reduce the cost of app development significantly. You don’t require separate developers for iOS and Android. And you don’t require two separate code repositories either.  

Facebook created it and developers swear by it. Instagram, Skype, Airbnb, Walmart, Tesla – the world’s most successful apps are using it. React Native, An exciting, open-source framework is fast becoming the most popular choice for developing both iOS and Android apps.

So far we have had amazing success with React Native. It allows you to create apps that are similar to their native analogs, both in design and performance.

We encourage our clients to first get their app developed solely for one platform, either iOS or Android. Once that version of the app is launched and tested, we advise them to build the other version.

Since each version has its own User Interface features, the cost for frontend creation can be very high, as you would need to hire several teams for each platform. One option is to go for a hybrid or cross-platform app. But in our experience, such apps have been lacking in performance capabilities.


Get a free quote for your app in 5 minutes


2. Use Minimal Design

It’s an outdated approach to spend months on planning and developing all the features, testing and then optimizing the app for the market. Chances are that you might end up investing a lot of time and money into developing features that the users may not eventually care for.

That’s why we recommend minimal design. By using design sprint, you can compress months of work into a single week – a five-day process for answering critical business questions through design, prototyping, and testing ideas with customers. Instead of waiting to launch a finished product, you can get customer reactions from a realistic prototype very early on without making any expensive commitments.


And by using Agile methodology, you can split an entire project into small sprints while keeping the long-term vision intact. Based on your consumer reactions, you can keep adding new features with newsprints. And if changes need to be made in a project, the team can respond to them quickly and fix the bugs simultaneously.

There is no need for re-planning or restructuring the entire project to fit any changes, thus helping you save a lot of money and time and reduce the cost of app development.


3. Launch a Minimum Viable Product (MVP)

We always encourage our clients to launch the first version of their apps with minimum functionality and keep all the secondary features for later development. This will help you keep the cost of app development low. It’s only after you have identified the demand for additional features that you must start investing in them.


MVP fits in perfectly with agile methodology. It reduces costs and helps you avoid failure at a later stage.

By launching an MVP, you can test your core idea at a very early stage and in a very low budget. You can identify improvements and bugs in advance, without losing too much time, money or resources.

Not only does it keep costs down and speed up the development process, but it also allows you to develop your app with real user feedback when launched. By launching an MVP, you shall never be faced with the problem of users wanting something different from your ideas.

So don’t waste your time developing detailed interfaces and branded designs. Instead, implement an early version of your app. Fail fast and learn fast.


4. Outsource first, hire later

If you do not have in-house expertise in app development, don’t waste time and money building a team from scratch. Instead, outsource your work to gain speed. But make sure that you keep the code review process internal so that you don’t end up with an unstructured code. You could even rent a code reviewer if you don’t have one internally. But once you have reached the stage of finding a product-market fit, you should build a team for scaling up.

Meanwhile, for outsourcing purposes, go for a company that offers you end-to-end services and access to a large talent pool. If you have too many different hires from different places involved in the same app development project, you might end up losing hours of sleep coordinating with them in different time zones.

We recommend you hire a company that takes full accountability of testing, developing and fixing bugs, and employs best practices from design sprint, Agile and UX. All these factors will significantly reduce your cost of development and time required in building your app.


5. Use readymade solutions

A completely original and authentic software foundation for an app can increase the cost of app development and take a lot of time. To reduce the cost of app development, we encourage the approach of re-usability, either through the online tools or through a company that can provide you so.

There is already a huge glut of reusable libraries available for React Native, and a lot more is being added to the community by top companies such as WIX.  

We are doing our bit too. Having built over 100 apps reaching 10 million users in the last four years, we are creating multiple reusable components to add to the libraries for web frontend (React JS), mobile app (React Native) and backend (using Java, Sprint-Boot).


We have already created generic components such as those required for registration, login, authorization, CRUD screens, notifications, analytics, payments etc. to shorten the development cycle. This way we don’t have to build these components from scratch for new apps each time. We code a lot less and create a lot faster. Our goal is to reach a point where we can develop 70% of the requirements through our reusable components list, and only code the rest 30%.

Keeping these hacks in mind, we recommend you go back to the app calculator and find the cost of your app again. We guarantee you that this time your estimate would be much lower. If not, give us a holler to negotiate the cost.


Get a free quote for your app in 5 minutes


How to take an idea to app launch in 8 weeks?

Let’s say you have to take your idea to app. On average, it will take you about six to eight months to build/launch it. And it will easily cost you around $80-100k.

What if you could do all of that in half the time and almost half the budget? Well after having built 100 apps with around 10M users, and having failed multiple times in the last four years, we have finally devised a perfect formula for taking your idea to app in exactly 8 weeks in a budget of less than $50k.

By removing all the inefficiencies and waste out of the app development and design process, we have arrived at an incredibly clean, focused and fast-paced development cycle to speed up the journey from idea to app launch. (explained step-by-step below).

Timeboxing hack

Earlier our projects used to languish for weeks as the team would slog through the five stages of Design thinking: empathizing with user needs; defining user needs and problems; ideating by challenging assumptions and creating ideas for innovative solutions; prototyping solutions; and testing solutions.


Now we use the design sprint that forces you to do all of it in five days. You have a set of clear exercises and goals (explained step-by-step below), and at the end of each day, you measure your progress. Each sprint results in an outcome that can be presented to the user in the form of a prototype.

Agile hack

Even though we still follow Agile as before, we have fine-tuned it to maximize the efficiency of developers. Earlier, our developers would be pulled out of a running sprint on every Thursday to discuss user-stories for the next sprint in backlog refinement. This would take their focus away from the task at hand, making the development process much slower.  

Now, thanks to Mike Cohn, we have a 3-day user story workshop upfront in which all the user stories for the next three months are written. And everyone is held responsible to write the stories. Not just the Product Owner. Even the developers and testers are involved in writing user stories. It makes them feel more connected to the product rather than just playing the role of code monkeys.

Re-usability hack

Through creating multiple apps over the years, we have been able to create a list of multiple re-usable components and libraries for web frontend (React JS), mobile app (React Native) and backend (using Java, Sprint-Boot). We have chosen React so that we could maximize code sharing between web, iOS and Android. That means we code less.

We have created generic components such as those required for registration, login, authorization, CRUD screens, notifications, analytics, payments etc. to shorten the development cycle. This way we don’t have to build these components from scratch, for new apps each time. Our goal is to reach a point where we can deliver 70% of the requirements through our re-usable components list and only develop the rest 30%.


Week-by-week plan from idea to app launch

Now to help you understand how we achieve our goal of launching an idea to app in 8 weeks, we have jotted down a week-by-week lowdown of our perfect formula that combines the best practices of Design Sprint, UX and Agile:


To execute an idea to app, you need a cross-functional team consisting of:

  1. Product Owner (PO)
  2. UX Designer
  3. Frontend developer
  4. Backend developer
  5. Tester
  6. DevOps
  7. Scrum Master (SM)

In building such a team, you are bringing the best practices of each department to the table. There is better communication, more accountability, and the overall progress of the team can be measured from multiple perspectives. You don’t lose time coordinating between departments or playing politics. Each member feels connected to the product.  

Once you have a solid team in place, you start working on your daily tasks. In week one, you run the design sprint — a focused five-day process to quickly gather insights on users, prototype ideas and then validate them. The idea of getting immediate feedback is to save yourself from spending months on designing and developing a product that your users may not need.

Week 1: Design Sprint (Idea to App Prototype)


Monday: Map out the key problems and find a focus area

  • First, gather as much information as possible about the idea and create a user journey map. Identify the complete flow of how a user will fulfill his/her goal using your product/service.
  • For each user task, identify the problems or pain points faced by the users.
  • Put down all the assumptions in How Might We format and identify one or two key problems that need to be solved with the app.
  • Focus on one piece of the problem that you can solve in a week

Tuesday: Sketch competing solutions on paper

  • Research the existing apps in the market that is solving the problem you choose to address.
  • Once you have found some inspiration, let each member sketch out its own solution. This will help you make your abstract ideas more concrete.
  • Start zeroing in on customers that fit your target profile for testing on Friday.

Wednesday: Turn your ideas into a testable solution

  • Critique each sketch and choose the ones that have the maximum potential of meeting your end goal.
  • Take the best parts of the chosen sketches and create a storyboard: a step-by-step plan for building your prototype.

Thursday: Create a prototype

  • Start working on the customer-facing surface of your app so that you can finish your prototype in a few hours (or maximum one day). All you need is a feature that looks real to test it with your customers on Friday.


  • One of the cheapest ways to prototype your app idea is to use the easily available online tools such as Keynote and Invision.
  • Make sure everything is ready for Friday’s test: schedule, prototype, and an interview script.

Friday: Test with real customers

  • Test your prototype with real customers, could be virtual, outside your building or inviting users in your office.
  • While interviewing your customers, observe and learn how they interact with your prototype. Their reaction will tell you how you would iterate the designs in next Sprint.

Between Design Sprint and Sprint 1, we have Sprint 0 in week 2.

A week that is solely focused on creating user stories for the next three months and doing the initial tech. setup required to start. Sprint 0 helps each member to hold accountability for the user stories they write. It helps them focus better in the upcoming sprints because they don’t have to worry about understanding user stories in the middle of an ongoing sprint in backlog refinement.

Design Sprint is an important milestone to achieve from idea to app.

Week 2


Monday and Tuesday

  • Once you have tested your prototype with customers and identified two prominent features that would solve your customer problem, start writing down user stories following Scrum in Agile.
  • Split the two features into smaller user stories spread across the next three months in JIRA, or use free tools such as Trello to do the same.


  • Each team member must write user stories to hold accountability and gain a deeper understanding of the features and product they are creating.
  • Team members must decide the success criterion of the feature and analytics that need to be measured in it.

Wednesday, Thursday and Friday:

These tasks must be performed in collaboration among team members –

  • Agree on the technology stack
  • Create database architecture.
  • Map requirement to re-usable components list to see what can be re-used and what needs to be developed
  • Use boilerplates to set up the dev and demo environment (firebase, crashlytics etc.) and bitbucket repository
  • Set up the Jenkins pipelines and AWS cloud
  • Set up slack channel for communication

In addition, the UX designer and Product Owner (PO) work closely together to create a developer ready designs on sketch app for Sprint 1 and get feedback internally from the rest of the team.

In Sprint 1 (week 3 and 4), team develops one selected feature and test it internally with PO for immediate feedback in order to make informed decisions, such as whether the feature is solving the problem of the users, how it needs to be changed or tweaked to meet the the user needs and how the next sprint must be planned.  

Week 3 and 4 


Monday of week 3:

All the sprint planning must be achieved on the first day of the week. The entire team has to agree on the set of user stories needed for the current sprint.

Tuesday, Wednesday and Thursday and Friday of week 3 and Monday, Tuesday, Wednesday, Thursday of week 4 :

  • Now is the time to start writing the code for Feature 1. Make sure to write clean code and maintain flawless back-end connections because they will help you maintain the code easily and deliver new features faster
  • While the development team works on developing and testing Feature 1, PO and UX designer update or write user stories for the next Sprint and create designs on the sketch app.
  • Once Feature 1 is developed and internally tested by testers, it is deployed on the demo environment on the cloud.

Friday of week 4

  • At the end of the two-week sprint, all the team members must sit down and have a Sprint Demo and Retrospective. In demo meeting, the team shows the completed user stories to the Product Owner and seeks his acceptance.
  • In Retrospective, the team reflects on the sprint output, and finds ways to improve. Nowadays we use Lightning Decision Jam for that
  • One of the biggest advantages of having short sprints is that they allow you to incorporate feedback from customers.
  • You can plan your next sprint based on your findings in the sprint retrospective.

In Sprint 2 (week 5 and 6), we develop another selected feature and test it internally for immediate feedback in order to make informed decisions. But in addition to that, we make use of the quick feedback received on  Feature 1 and start fixing all the bugs in it. The goal is to reach perfection incrementally by actively engaging with users.


Week 5 and 6 

This two-week sprint focuses on building Feature 2 and fixing the bugs found in Feature 1 during customer testing on the demo environment.

As the launch date approaches, the Product Owner and Marketing expert start building landing pages to create awareness about the upcoming app, using tools such as squarespace or unbounce.  

They also prepare all the app store submission requirements like app icons, app screenshots, descriptions etc. You could follow one of the app submission checklists available online for that.

Campaigns on Facebook, Instagram, Twitter etc. help in creating the initial 20-50 downloads – a solid pool to do your first tests with real customers.


Week 7 and 8 (Idea to App launch)

This two-week sprint focuses on fixing the bugs found in Feature 2 during customer testing on demo environment.

Once Feature 1 and Feature 2 are tested and all their bugs are fixed, set up the production environment and submit your app to Google and Apple App stores.

Beyond week 8

After the first two features are launched, the development team continues to build further features in the same format of bi-weekly sprints.

The Product Owner continues to test the launched features with wider audience face-to-face. He captures new insights and requirements, tests them using feedback and data, and collaborates with the team to develop new features and components. It is the responsibility of the Product Owner to act as a liaison between the end customers and team members.  


The iterations of the features continue until the point of the success criteria defined by the team in Sprint 0 is achieved.

Through all these iterations, the team strives to find answers to the following questions:

  1. Who is using the app?
  2. How often are they using the app?
  3. Why are they using the app?
  4. How could we acquire more users?
  5. How can the existing users be converted into paying customers?

Getting answers to these questions might take anything between 8-16 weeks after the first launch. But once you get the answers, you will be able to achieve the desired product-market fit.

Behind Every Relationship, There Is An App

Lola is a 20-something, attractive woman whose long-term boyfriend dumped her three years ago. In a text that didn’t even display the courtesy of a spell check. Tinking we shd backup (read breakup). She cried relentlessly (six times a day on an average) for months to follow.

Relationship Status: Complicated

Drowning in her own quicksand of self-pity, she activated the Drunk Mode app to avoid sending emotional texts to her ex after getting wasted.

Two years ago she could have been easily dismissed as a ‘dating disaster’. Starved of happy hormones and bereft of any self-confidence, she resorted to digital therapy of sorts. She downloaded the Rx Breakup app that helped her get over her crazy obsession in exactly 30 days.

But she needed a lot more than a temporary self-esteem boost to get back into the dating game. Incidentally her friends signed her up on Squad. A casual group hangout app that is often used as a discreet back doorway to dating.

For Lola it was a healthy way to graduate to Tinder. One month into it, and she had begun swiping like a pro. On an average she went on three dates every week (mostly starting Thursday). During happy hours to load up on two-for-the-price-of-one drinks.

“It’s cut-throat out there. Everyone’s a slut. I am tired of sharing the same anecdotes with the same enthusiasm every week. Sometimes I am not even interested in a guy, but I just play along because I don’t want to go back to an empty apartment or binge watch on Netflix,” she wrote in an anonymous blog post.

It was disturbing how Lola had created a psychological urgency to find a spouse before she hit 30. There was also a callous indifference in the way she strung along some of her past romantic relationships through Instagram. “My biological clock was ticking. I had to act smart. I had two guys in the backburner. It didn’t cost much to comment on their pictures. And it kind of kept them interested in me,” she wrote in yet another anonymous blog post.

Relationship Status: Committed

After almost 87 dates, 2 one-night stands and one polyamorous relationship, Lola finally changed her Facebook status to ‘Committed’. Puffy the Cat got replaced by a sultry looking bloke called Eduardo.

And her romantic commitment was apparent in every post she published thereafter. Check-ins at restaurants. Check-ins at spas. Check-ins at shopping malls. Feeling loved. Feeling hungry. Feeling sleepy. Feeling pampered. With whom? Eduardo of course.

Congratulations, congrats, felicidades! These trigger words on her wall shot Lola to a temporary fame of three days, as Facebook algorithm bumped her happy posts on her friends’ new feeds. A Snapchat video of how Eduardo proposed to Lola at sunset facing the romantic waters of the Mediterranean got 1,174 views.

Relationship Status: Married

One day before the wedding, Lola cleared her phone of all the Whatsapp chat histories and wicked apps that got her through the ordeal of being single. The idea was to make a clean start. Have no secrets. Share a new intimate bond with her partner. So much so that the duo even exchanged their passwords with their vows.

After all what was there to worry? The Marriage Material app had already confirmed that their compatibility score was above average compared to other happy couples. All their wedding jitters of dress fittings, white tulips, music band and dinner rehearsals were ticked off on WeddingWire. The only thing that remained was streaming this life event on Youtube.

Fast-forward seven months and Lola was sending her first-trimester belly photos to Eduardo through The Bump, an app that tracks week-by-week pregnancy of mothers-to-be.

Relationship Status: None of your business

And just when you thought they had the most clichéd pattern of life, Lola caught Eduardo having an affair with a colleague. His phone was filled with sexed-up messages and semi-naked selfies. His online behavior had changed significantly. He was changing his profile picture way too often. And the incessant sharing of his daily runs, moods and horoscopes showed him in a different light.

At this stage, no digital remedy, be it Fix a fight or Marriage and Counselling app could put the shards of Lola’s broken relationship together.

From anger to angst to absolute indifference, Lola went through various stages of grief until she started living in a silo under the same roof with Eduardo. Yet there was continuous spying and tailing. Digitally though.

It was an irreparable damage. Emotionally and financially. Divorce seemed like a workable solution. But they were too exhausted to go through the charades of legal attorneys and mountains of paper work. So they agreed on one last thing.

At less than a thousand bucks per month in legal bills, they sorted their divorce on their smartphones through a frugal divorce app called Amicable.

Relationship Status: Still Exploring

Rightfully so. In this day and age of digital madness, our phone apps are perhaps a better reflection of our relationships/behavioral statuses than our own instincts.

Now Lola may seem like an exaggerated manifestation of digital-emotional drama. But sadly we meet and experience bits of Lola everyday.

And thanks to Data Analytics, Google is now luring Lola into exploring the likes of Divorce Dating to find love/companionship second time around.

This article originally appeared on Huffington Post