Lean UX Archives | Lean Apps GmbH

Lean UX: Create a Minimum Viable Product

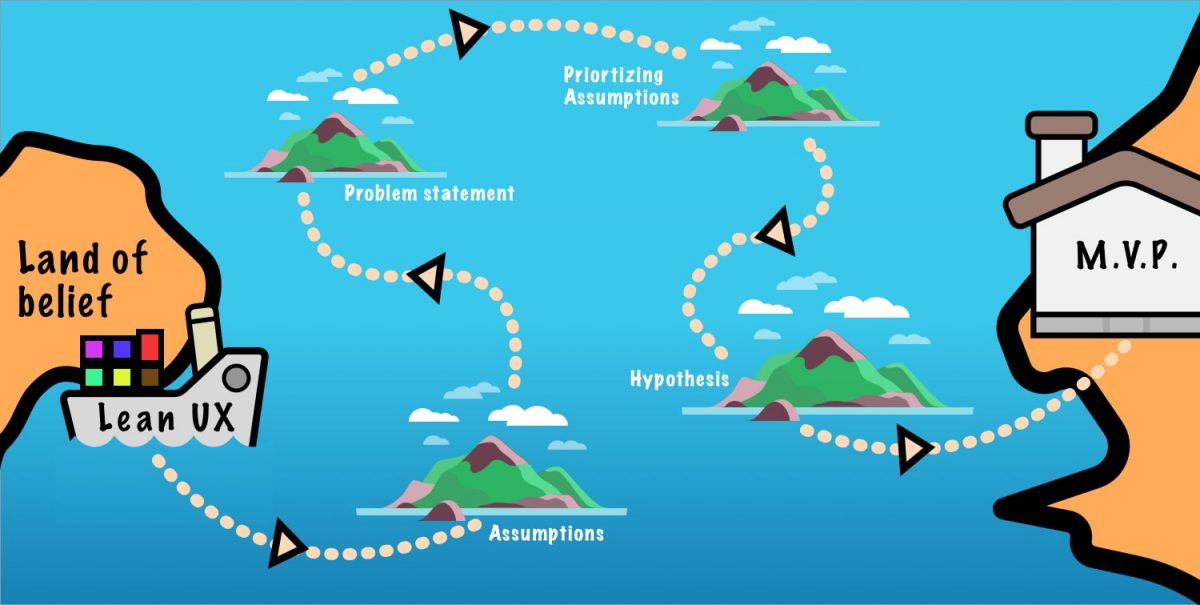
Lean UX is all about cutting waste and minimizing work required in creating a product or service. That’s the reason a Minimum Viable Product (MVP) is used heavily in its process. It is perhaps the fastest and cheapest way to find out whether a feature is worth investing in at a very early stage.

An MVP is the smallest thing you can create to test the validity of the hypotheses statements you have made.

To build an MVP, you need to know whether

a) There is a need for the solution you are designing

b) There is value in the features you are offering

c) The solution is usable

Keep in mind that MVP is not your final product. You will iterate and modify it multiple times. MVP should be treated as a tool for learning.

Following are the ways in which you can build an MVP:


Learn how to build an mvp?


1) Prototyping

A prototype is like a rough draft of the final version of the product. It allows you to simulate the experience of using the product without actually creating it. And you expend as little effort as possible in building it.

Depending on who would interact with your product, what you hope to learn and how much time you have at your disposal will allow you to choose which prototype to build.

Take a look at the examples below.

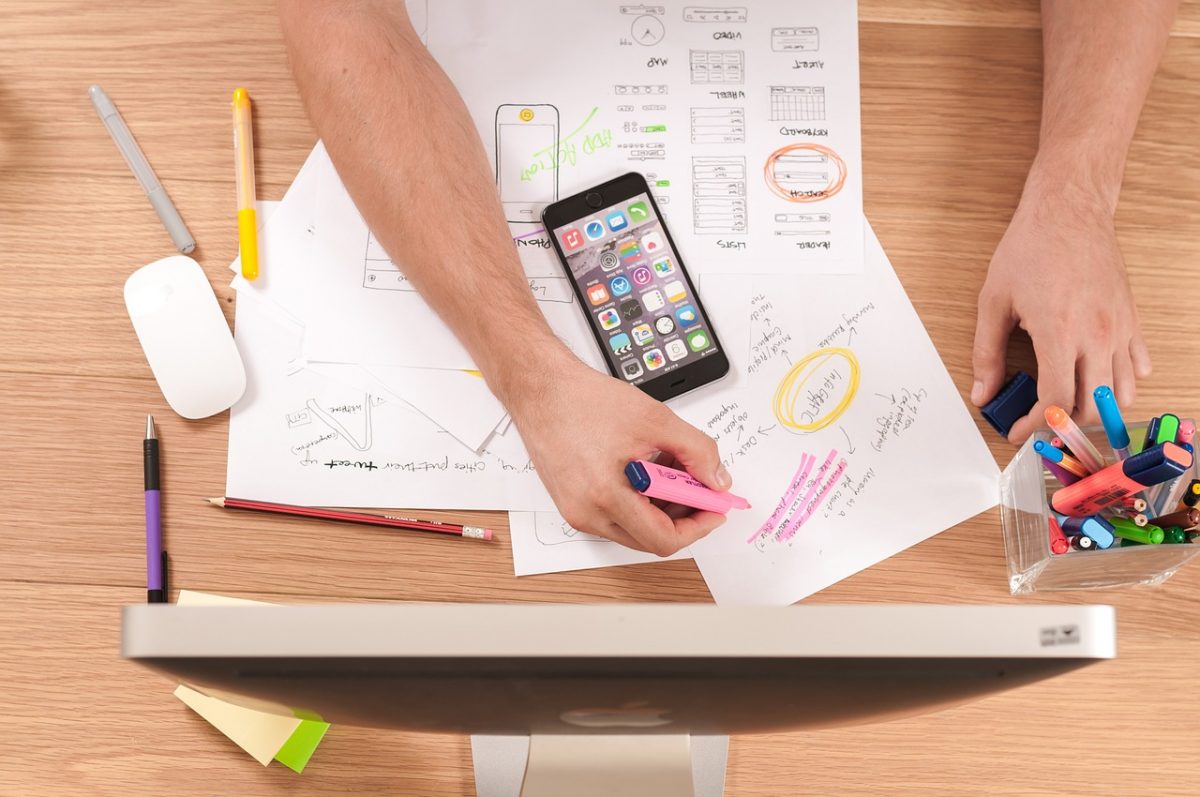
  • Low fidelity Prototypes: Paper

These are prototypes that can be built under an hour’s time. And all you need is a paper and pen. Commonly known as Paper prototyping, it involves sketching screenshots on paper as substitutes for digital representations. They are often used to create and test user interfaces quickly and cheaply. And they are highly useful in early-stage conceptualizing.

  • Low fidelity Prototypes: Clickable Wireframes

If you want to take your prototype to the next level, create clickable wireframes: a visual/onscreen representation of the user interface of a website/mobile app. The biggest advantage of clickable wireframes is that they can, to some extent, simulate the interactive experience for users as if it were the final product. And depending on the user experience and feedback, teams can iterate and modify these wireframes until the users are satisfied and the prototype can be used as a framework for the final application.


  • Mid and High Fidelity Prototypes

 These are more detailed prototypes created with a visual and content design that is similar to the final product. You can create specific interface elements such as forms, fields, drop-down menus etc. And they allow you to assess a more precise user interaction and behavior.

Coded Prototypes offer the highest level of fidelity in creating simulated experiences for users. In such prototypes, users are unable to recognize the distinction from the final product. This is because such prototypes create as natural an interaction as it would be with the final product. They exist in the native environment such as the browser, on the device etc.

But the key question is what should go into making your prototype.

A prototype is not created to simulate the entire product experience. Instead you must flesh out the most important part of the experience for your users. Focus on the core workflow. Build an MVP around it and assess its validity first before moving forward.

Demos and Previews: As a first step, you could test your MVP with teammates, colleagues in other departments and stakeholders. Ask them to give you a detailed feedback on a) how well the product works; b) how they would use it in their routine; c) is it worth more investment?

Prototypes are the best way to demonstrate your progress to stakeholders. On the demo day, show the prototype to your stakeholders to get validation. You could also take it to your users and get feedback.


build an mvp


2) Non-prototype MVPs

A non-prototype MVP is best employed when you are looking to test the value of a particular feature of your product. It’s perhaps the most efficient way to know whether you are on the right track. And keep in mind that creating a prototype is not always necessary, especially if you have an option of going leaner. One of the questions you can ask yourself is what is the fastest way of finding the information you are looking for.

Following are the ways in which you can create non-prototype MVPs:

  • Email: it is the simplest way of learning about your users. You can collect data on the basis of open rates, click-throughs etc.
  • Google adwords: you can experiment cheaply by purchasing google adwords and assess what kind of messaging resonates with your users.
  • Landing page: A simple landing page with a call-to-action button (sign-up, buy now tec.) can help you validate your product idea with actual users.
  • User-button: If there is a new feature that you would like to test, simply have a dummy-button. The number of times this button is clicked will allow you to determine whether you have interested users. Of course, you would have to give out a simple message why the feature is not working (Eg: we are building it for you, we are on our way etc.). Or ask the interested users to leave their email address.

Once you have build an MVP, the next step would be to put it to test.

(Reference: Lean UX by Jeff Gothelf and Josh Seiden)

Lean UX: Focusing on outcomes

In traditional UX design projects, teams were often given requirements and then expected to create deliverables.

In Lean UX, you don’t create deliverables. Instead, you create outcomes.

You don’t start with requirements. Instead, you start with assumptions.

You create and test hypotheses. And at every step, you measure the outcome.

Lean UX radically changes the way you approach your work. It helps you achieve outcome-focused work. And the key tool to achieve it is: hypothesis statement.

A hypothesis statement is the starting point for any project. It is the simplest way of declaring assumptions in a testable format.

Here are the steps you can follow to achieve a more outcome-focused work in any given project:


1) Declare all your assumptions

As a first step, gather all your team members, including those that may belong to other disciplines but are vital to your project. Ask each member to put down his/her assumptions on the white board. It will give you a common starting point.

The motive behind this exercise is to give every member an opportunity to voice his/her opinion on how best to solve a problem. In doing so, you will possibly see a huge divergence in opinions among team members and a broad set of possible solutions. Don’t worry about it.


2) Define your Problem Statement

So far you might have team members focusing on different problems with different solutions; or solving the same problem with different solutions on the white board.

What a problem statement does is that it gives your team a clear focus. It helps you define important constraints that are essential to any group work.

A problem statement consists of three elements:

a) The goal/s of the product.

b) The problem that the business stakeholder wants to solve (and is most likely failing to do so).

c) The demand for a specific improvement in the product.


Here is a template: [Our service/product] was designed to achieve [these goals]. We have observed that the product/service isn’t meeting [these goals], which is causing [this adverse effect] to our business. How might we improve [service/product] so that our customers are more successful based on [these measurable criteria]?


It is not necessary that you will have a clear problem statement at the beginning. You revise it as you go further in the process.

But a problem statement is usually filled with assumptions. An important exercise here is to ask your team to strip off all the assumptions using this worksheet.

Remember that you can adapt or tailor these assumptions/questions depending on the stage/type of your project.


3) Prioritize your assumptions

Now you have already got your list of assumptions on the white board. Next step would be to go through them and put them in an order of priority based on their level of risk. Try and think this way: what would happen if this assumption were false? How bad would it be?

The higher the risk, the higher the priority of that assumption should be. So the assumption that poses maximum risk to your project should be tested first. This does not mean that the rest of the assumptions won’t be tested. You will have to maintain a backlog and test them later as per their priority.  


4) State your hypothesis

You can’t simply test your assumptions. First you need to convert them into a format that is easier to test. That’s called a hypothesis statement.


Here’s a template:

We believe that (doing this/building this feature/creating this experience) for (these people/personas) 
will achieve (this outcome).


We will know this is true when we see (this market feedback, quantitative measure, or qualitative insight).


In order to fill this template, you would require the following building blocks:

  • Outcome

First focus on the problem you are trying to solve. You will see that you already have a few standard, larger outcomes that you want to achieve. Now try and break these into smaller parts.

For instance, let’s say you are looking to get more sign-ups for your service. Now break this broad outcome into something more specific, such as what behaviors will predict greater usage? Would increasing the number of items in your shopping cart help?

Ask your team members to create a list of small, specific outcomes that can help you achieve the larger outcome.


  • Personas

Often designers create personas to define their potential users. But if you don’t have a proper methodology to devise personas, here’s what you can use in the Lean UX process.


Create working-personas

Working-personas are created through guesswork done by team members. You start with your initial impression of users, or who you imagine your users would be. You put down the assumptions of all the team members.

And as your project progresses, you find out how accurate your working-personas are and adjust them to your actual users.

This is perhaps the fastest way to create and test personas. Instead of spending months researching and interviewing people, you simply spend a few hours brainstorming with your team and create working-personas. And as the project progresses and you gather more information, your assumptions will be validated, or not.


Use the following template to create working-personas:


In the first quadrant, you just need to fill out your potential user’s name and role. In the second one, you need to fill out basic demographic information such as age, gender, hobbies etc. The more you focus on information that predicts a certain type of behavior, the better your results would be.

For instance, whether a person owns a television may be more relevant for your product than his/her age.

In the third quadrant, you need to fill out the various frustrations that your user might be dealing with and the pain points that your product tries to address. In the fourth quadrant, you put down the potential solutions for those pain points.

Through this process, you might be able to create multiple working-personas. But eventually you must zero in on four key personas that come closest to your users.

  • Features

Features are the most concrete way to achieve the outcomes that you have listed above. In the traditional design process, you usually start with features or an idea around a feature and then work backward to try to justify them. But in the Lean UX process, features appear as a result of the needs of the users and businesses.

Start thinking about features only after you have narrowed in on your outcomes and users. Ask your team members to write their ideas of features on the board and have them explain how they think it would drive the user behavior in the desired direction.  

  • Gather your material

Once you have gathered all this raw material, you must organize it into a set of testable hypotheses. Use this template to create categories:


You must try and examine what solution is serving which persona. If you find that a single hypothesis drives more than one outcome, then you must split the hypothesis. You want each statement to refer to only one outcome.

The goal of this exercise is to ensure that your ideas are specific enough to carry out meaningful tests.

And once you are done with your list of hypotheses, you are ready to move on to the next step: MVP.

(Reference: Lean UX by Jeff Gothelf and Josh Seiden)

LEAN UX: A recipe for speed and innovation

The ultimate goal of Lean UX is to deliver a great user experience. It’s a highly practical technique that takes into account three key Lean principles:

First, it helps you remove all the waste from your UX design process. It eliminates heavy documentation and focuses only on creating the design deliverables you need.

Second, it brings a higher level of collaboration and transparency in your process. It even drives developers and engineers to get involved in the design process.

Third, it focuses on obtaining early feedback through experimentation. Instead of relying on a single person’s decision, you test and measure at each step to meet your goals.


What is Lean UX?

Lean UX is more than just a practical technique. It is a mindset shift. It breaks down all the barriers that create silos in a business. It pushes business and technology teams to sit down and create the best possible solutions.

In essence, Lean UX is about overcoming the fear of showing work that you perceive to be ugly or unfinished. It’s about gaining confidence in your ability as a team.

It’s about working towards building a product or service that will require multiple iterations. There is hardly a chance that you will get it right in the first go.

Lean UX is the practice of bringing the true nature of a product to light faster, in a collaborative, cross-functional way that reduces the emphasis on thorough documentation while increasing the focus on building a shared understanding of the actual product experience being designed.


Core Elements of Lean UX

Here is a toolkit that will help you put together the practice of Lean UX in your company:

1) Start with creating cross-functional teams.

A cross-functional team must have members from every department that are involved in creating your product. Be it software, business, design or product, every team member should be involved from the very start of the project.

Reason? Collaboration becomes a lot easier. Teams become more efficient as there are no handoffs or waiting periods involved. The knowledge and insights from all disciplines are brought in early in the process.


2) Create small, dedicated teams.

There should not be more than 10 people in a team. And if possible, they should all be dedicated to the same project and based in the same office.

Reason? Smaller teams tend to have better communication. And if they are given the same project, they can share their goals and priorities with each other. Their relationships can strengthen even more if they work in the same location. Plus it’s easier to keep a tab on their project status or any changes.


3) Measure your progress.

Don’t focus on features and services. Focus on the goals that they are meant to achieve. Every goal should be measurable.

Reason? If you only focus on features and services, then you are assuming that they will definitely work in the market. By focusing on goals and the progress made towards them, you are able to assess a feature is worth building or not. And in case it is not performing well, you can make a sound decision about discarding or changing it.


4) Assign teams to solve problems.

Assign your teams to solve problems rather than implement given solutions or features.

Reason? When you assign a problem to a team, it has to come up with a solution on its own. This helps the team to build confidence and take ownership of the solution that they build or implement.


5) Cut out all the waste.

Anything that doesn’t add value to the ultimate solution is considered waste. And it should be cut out from the team’s process.

Reason? You want to utilize your resources effectively. You do not want your team to focus on false challenges. The sharper your focus is, the faster you can move towards your desired goals.


6) Create what is necessary.   

Create only those design deliverables that are necessary to move the team forward. Avoid creating a stack of untested and unimplemented design ideas.

Reason? You do not want to slow down your speed of delivery by unnecessarily creating ideas that have not been validated. It’s a waste of time and resources.


7) Learn from your users early on.

If you want to find out what your users are doing with your product, you must start engaging with them during the design and development process.

Reason? If you are regularly in touch with your users, you can validate your ideas much faster. Only your users can tell you whether you are building a product they actually need.


8) Get out of the building.

Gone are the days when user needs were determined in meeting rooms. Now you need to get out of your office building and go to the marketplace to determine the problems your users are facing. The success of your product or service can only be determined by your users.

Reason? Before you spend a lot of time and resources on your idea, you must get feedback from your users to validate what you are building. Do they really need what you are building? The earlier you know what they want, the less time you will waste building something that they don’t need.


9) Encourage the team to learn collectively.

It is essential for a team to collectively develop a deep understanding of its product and users.

Reason? If the team understands its project thoroughly, the less it has to depend on heavy documentation or debrief conversations to move forward in its work.


10) Avoid creating rockstars in your team.

The team must work together without following any experts or rockstars for better collaboration and unity.

Reason? If team members start aspiring to acquire a higher status within the team, they stop sharing their knowledge and often develop big egos. This leads to poor collaboration and dirty office politics.


11) Make your work public.

Use whiteboards, sticky notes or whatever it takes to display your work in progress to your teammates, colleagues and customers.

Reason? This allows transparency and better cross-functional collaboration. Whether you are an introvert or extrovert, you can participate equally without debating or defending your ideas. You let your work speak for you on the board.  


12) Create rather than analyze.

There is definitely more value in creating the first version of your product rather than debating over its pros and cons in your meeting room.

Reason? Often the most difficult questions get answered in the market place rather than the meeting room. Your customers will help you decide whether your product is worth investing in.


13) Learn rather than scale up.

Do not scale up a business or an idea that is untested or yet to be validated. Learning is the most important step. And it comes way before scaling.

Reason? It is risky to scale up an idea that is not tested. It is potentially a waste of time and resources. You can avoid a lot of waste by testing and learning about your business idea early on.


14) You should be allowed to fail.

If you want to come up with the best possible solutions, you need to keep experimenting. You need to keep failing. And you must feel safe doing that. There should be no penalty for failure.

Reason? If you allow your employees to fail and to experiment without inducing the fear of losing their jobs, they are likely to be more creative. They are likely to take more risks and come up with innovative solutions.


15) Get out of the deliverables business

Your design process should be focused on creating design deliverables rather than neat documents with elaborate descriptions.

Reason? The time spent on creating documents could be better utilized on learning your customer needs or creating features that they actually care about. Eventually, it’s not the documents that will fulfill your customer needs. It will be the product you are building.

If you want to create a successful UX team, make sure that you embody these core elements into your process.

(Reference: Lean UX by Jeff Gothelf and Josh Seiden)